Importing an Excel, Calc or CSV file
Spreadsheet programs (such as Microsoft Excel® or OpenOffice.org Calc®) store structured information, often displayed as a table:

The first row of a table, the header row, normally contains descriptions of the information stored in each column. Even simple text files can contain information structured in this way. All these files are relatively easy to import into Citavi.
The first time you import a text file with tabular data, you configure how reference types in the file will be mapped to reference types in Citavi. For example, if in your table you have the description "web page," you can tell Citavi to enter this data as an Internet Document (see step 7 below).
- In the Reference Editor on the File menu, click Import.
- Select File containing tabular data and click Next.
- Select the format of the file you are importing and click Next. (If you already created an import filter it is displayed here).
- Click Browse to select the file to import, and then click Next. If the spreadsheet or database file contains more than one worksheet or table, select the one that contains the references you want to import and click Next.
- If your file only contains one reference type (for example, journal articles) and for that reason doesn't contain a column with the reference type, select Not available on the Column/Field menu.
If the file contains a column with the reference type, select the column/field that contains it on the Column/Field menu. Then for each reference type in Citavi, type the name of that reference type as it appears in the file. For example, if your file calls journal articles "article", then type article next to Journal article. - Select the reference type you want to define the field mappings for and click Next.
- Assign the fields in the source file to the corresponding Citavi fields for the selected reference type.
Please note: for the import to work, at least one column needs to be assigned to the Citavi Title field. - After you are done with one reference type, you will see the message Do you want to define the field mappings for another reference type? If there are more document types in the source file that you want to define, select Yes. Then click Next.
To save the custom filter you have created for future imports using the same field structure, select Save as and type a name. - Click Next to begin the import.
Please note:
Depending on the size of the Excel file, it may take several minutes to prepare the import.
Import Hints
Importing files
You may want to import additional files for each reference, such as book cover images or PDF file attachments. To do so, in your Excel file you should create a separate column for the cover images and for the attachments. Enter the file path, for example C:\Users\john.doe\Documents\PDFs\Steinert_A systematic review of fac dev initiatives.pdf. During the import select the Citavi field Locations (electronic); for cover images select the Citavi field Cover art (file).
If you import the Excel file to a cloud project, the images and attachments will be uploaded to the cloud. If you import the Excel file into a local project, Citavi will only save the path to the attachments. However, you can copy or move all of the PDFs to the Citavi Attachments folder at once.
Importing location information
If you want to import multiple locations for a reference at once, you need to add multiple colmns to your Excel file. The columns need to be in the following order:
Location 1, Call number 1, Notes 1, Location 2, Call number 2, Notes 2, ...
During the import Citavi will add this information to the most recently created location. If the most recently created location already had a field to be imported (if it already had a location) then Citavi will create a new location. So, all of the fields for a location should be imported first before the next location is imported.
Importing categories
You can create a column for categories in your table to create a category system in Citavi. However, it's not possible to add a hierarchical structure. After the import you will need to use the arrow keys to put the categories into the right place.
If one reference has multiple categories, make sure to separate the categories with a semicolon with no spaces before importing:
Reference 1 | History
Reference 2 | Economics
Reference 3 | History;Economics
This rule does not apply to keywords.
Importing labels
In Citavi you can use a blue or red label to mark a reference. If you already use a similar designation in your Excel file, create one column for the blue label and one for the red label. Enter the value not empty or empty.
Special case: importing contributions in edited books
Excel files containing edited books and contributions in edited books have to be amended with two additional columns before they can be imported correctly.
- Insert a column for sequentially numbering your rows in Excel (see screenshot below: column A, label No.); each number has to be unique. This is not necessary if the edited books are individually identifiable by other markers, such as an ISBN number.
- Insert another column in order to enter the ID or ISBN number of the respective edited books (see screenshot below: column B).
Your Excel spreadsheet may look like this:
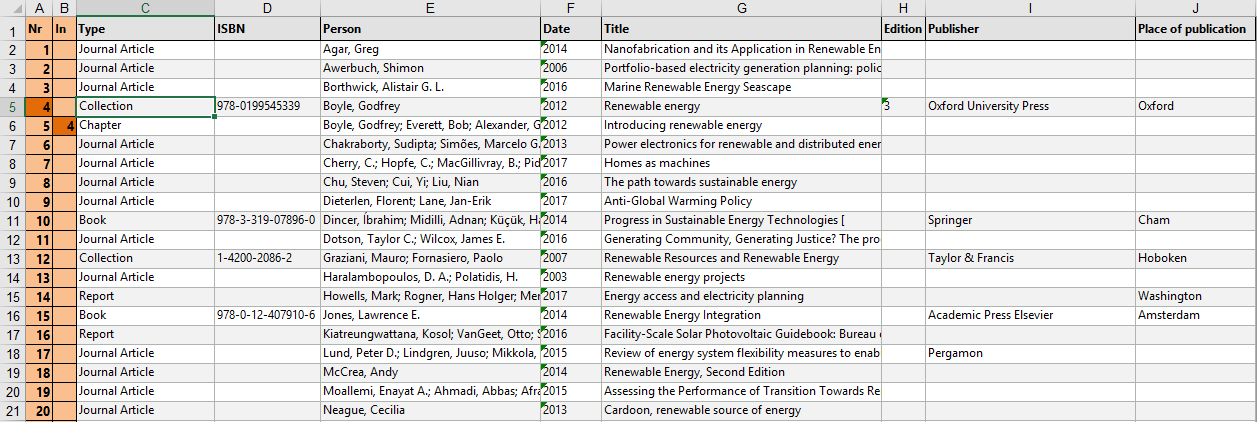
Start the assistant to import a file containing tabular data (see above). This will let you assign which fields in the source file are associated with the document type Book, Edited. Now select the column containing the previously defined, sequential numbering and link it to the Citavi field labeled Import ID. Remember to also assign the other fields in the source file to the corresponding Citavi fields for the selected reference type:

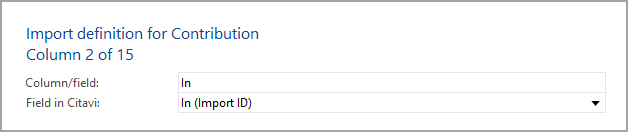
Likewise, proceed in the same manner when determining which cells are associated with the document type Contribution. Select the column containing the ID or ISBN and link it to the Citavi field labeled In (Import ID). This allows Citavi to identify the parent reference for each contribution: